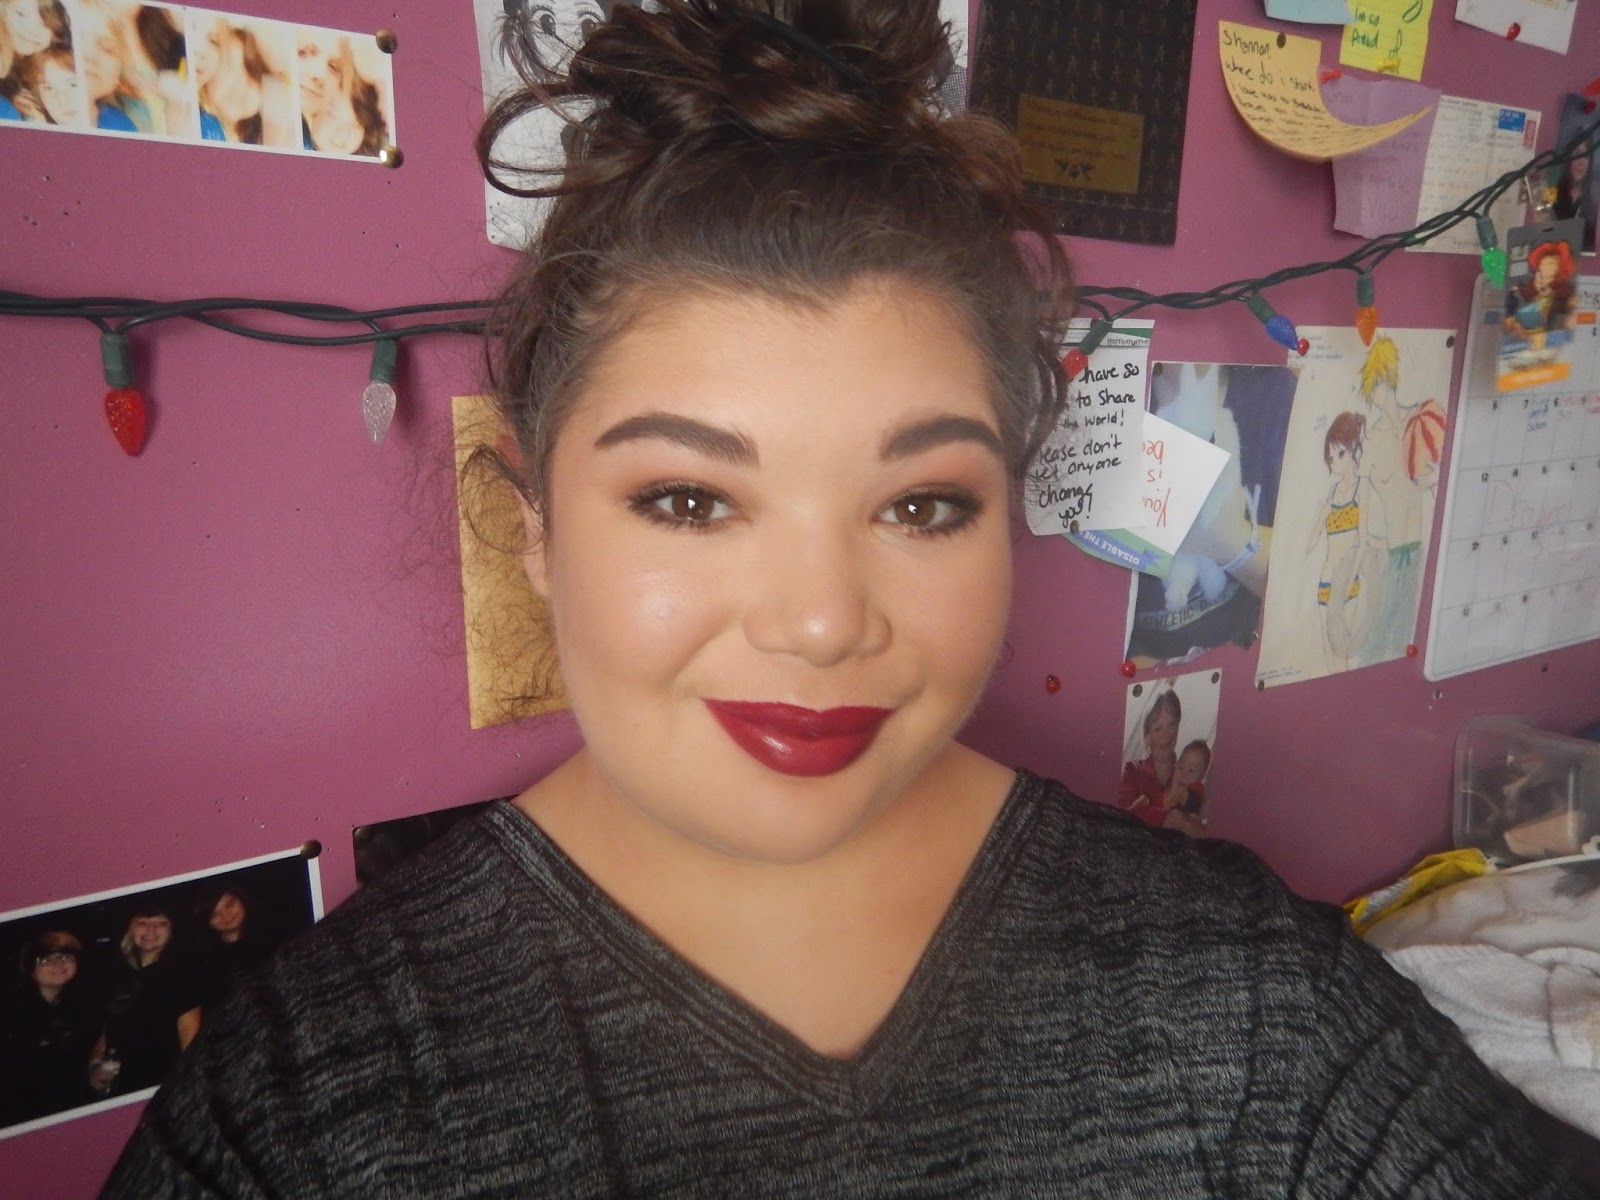
Hello, hello, hello!!
My birthday was the 11th, a few days ago, and as a gift, I was allowed to order this palette, and it came in the mail today!!
So here's some quick swatches on my skin, Some quick first impressions on the formula, and a quick tutorial I did the first time I used this palette!
So far, I'v swatched, and touched every shade, and I'v used seven out of fourteen in a look (the one below) and the formula is creamy, soft, and delicious. The two metallics/shimmers, are dense, and SO creamy. The matte's are a touch clumpy if you pick up too much, and can be very powdery!!
I'm really digging this formula though! we shall see how long it lasts on my oily hooded lids!
(It also passes the "shannon test" and I can JUST use this palette to do a whole look. AKA It has a matte cream/shade lighter than my skintone, a matte warm brown, and a matte deep brown!)
For this look, I started off with ELF sheer eyelid primer from lash line to brow bone, then I set that primer with Tempera (Matte white/cream), I took a fluffy blending brush and ran Raw Sienna (Matte orangey light tan shade) in the crease to start building it up, then I took a pencil brush and some of Red Ocher (Matte burnt red) and I ran that through the crease, but not as high as I took Raw Sienna. I took my 217 and buffed that out, then I picked up some of Antique Bronze (Satiny deep bronze) and I patted that onto my outer corners. I started by putting it onto the outer corner of my mobile lid and I blended it up onto my hood. I took a dense lid brush, and I patted Primavera (Highly shimmery yellowy gold) onto my inner 3/4 of my mobile lids, And up onto my hood a little bit in the inner corners. I blended the two lid shades where they met in the middle. Then I took a small stiff pencil brush and I packed and smoked out my lower lashline wtih Love Letter (Matte raspberry) I then took Vermeer (Highly shimmery cream coloured shade) and highlighted my brow bones, and inner corners. I then added mascara, and winged liner. And I decided to add some more of Love Letter ONTOP of Antique Bronze on my outer corners, so I took the fluffy end of the brush that came with the palette and I patted and lightly blended that!!
And that's it!! It looks like I spent SO much time layering, and blending. When in fact it took me like 10 minutes to do this!!
I'll be doing more looks with this palette in the upcoming while!! :)
Thursday, 16 February 2017
Kat Von D Lock it Concealer Creme Review/Swatches
Ello!!
Today we are talking about one of my favourite concealers!
I know it doesn't SEEM like it, but most day's i'm a lowkey face makeup kind of gal. Most days, I do a mattifying primer, then I'll do three dot's of concealer under my eyes, a swipe on each apple of my cheek. a dot on each side of my nose, and a swipe up my nose bridge. Then I'll buff that all out, set with powder and move on!
That's where this concealer comes into play!!
This concealer is a very thick, and creamy concealer. It covers my redness, and under eyes very well. And it doesn't take me a day and a half to blend it out!
I use the shade Light11 "neutral" but on my warm skin, it pulls VERY yellow. So I wouldn't say this is a true neutral shade.
First photo of myself (the one with my hair down), is my bare skin. I have zero makeup on in that photo, just sunblock!
The second photo, I'd used the Kat Von D concealer to even out my skin and perfect it.
This lasts all day on my oily skin when set with a powder ( I never not powder just fyi!), it doesn't crease under my eyes (I have dehydration under my eyes thus I have some fine lines!) But please do remember, I do not have wrinkles!!
I would and have recommended this concealer to friends before, and I'm now recommending it to you all!!
Price: $34
Pros: lasts all day, good shade match, good shade range, creamy, blendable,
Cons: Sets quickly. I'd recommend working in sections of the face with this. Could be too heavy for some.
Today we are talking about one of my favourite concealers!
I know it doesn't SEEM like it, but most day's i'm a lowkey face makeup kind of gal. Most days, I do a mattifying primer, then I'll do three dot's of concealer under my eyes, a swipe on each apple of my cheek. a dot on each side of my nose, and a swipe up my nose bridge. Then I'll buff that all out, set with powder and move on!
That's where this concealer comes into play!!
This concealer is a very thick, and creamy concealer. It covers my redness, and under eyes very well. And it doesn't take me a day and a half to blend it out!
I use the shade Light11 "neutral" but on my warm skin, it pulls VERY yellow. So I wouldn't say this is a true neutral shade.
First photo of myself (the one with my hair down), is my bare skin. I have zero makeup on in that photo, just sunblock!
The second photo, I'd used the Kat Von D concealer to even out my skin and perfect it.
This lasts all day on my oily skin when set with a powder ( I never not powder just fyi!), it doesn't crease under my eyes (I have dehydration under my eyes thus I have some fine lines!) But please do remember, I do not have wrinkles!!
I would and have recommended this concealer to friends before, and I'm now recommending it to you all!!
Price: $34
Pros: lasts all day, good shade match, good shade range, creamy, blendable,
Cons: Sets quickly. I'd recommend working in sections of the face with this. Could be too heavy for some.
Tuesday, 14 February 2017
Sephora Tarte 2017 Birthday Gift Swatches and Thoughts
Hello!! today's a quick post, with my thoughts on the Tarte Birthday gift from Sephora!
In the Tarte birthday gift, you receive:
1mL of Tarte matte lip paint in the exclusive shade Birthday Suit
1.5G of Tarte Amazonian Clay Blush in the exclusive shade Paaarty
To cut to the chase, these are TINY ass samples. The Lip pain was made in the USA, and the Amazonian clay blush was made in China. (make of that what you will)
Both shades are very neutral, and "nude" on my skintone. I know these would NOT work on super dark, rich skin. Which SUCKS. In my opinion they should have done a super pigmented rich blush shade, because those are more universal. Fair skinned people can buff and sheer it out on the cheek, and dark skinned people can layer it up once or twice. You know?
This is the Lip paint in the shade Birthday Suit on my NC20/25 Skin tone. It's about as "nude" as I would ever go, personally. I have never tried the matte lip paint formula before, and I don't know if it's just this shade? but this feels SO grainy on my lips. it feels like I did a lip scrub and didn't wipe/lick it off. It helps if I apply it all over, and then blend it in with a warm finger. But still. Weird.
Again, this is my first time trying the amazonian clay blush formula. This is a pretty matte pinky nudey shade on me. In the photo above, I have about three layers of it on my cheeks buffed in. It was slightly hard to blend, but I will be honest and say, I don't use or own any matte blushes, so I'm not used to the way they buff and blend. So! I think this will be a good blush shade for days where I'm wearing a bright lip and just want a hint of something on my cheeks!
Overal: I don't know! I like the blush, but could live without the lip paint.
If you've gotten this sephora birthday gift, what do you think?
In the Tarte birthday gift, you receive:
1mL of Tarte matte lip paint in the exclusive shade Birthday Suit
1.5G of Tarte Amazonian Clay Blush in the exclusive shade Paaarty
To cut to the chase, these are TINY ass samples. The Lip pain was made in the USA, and the Amazonian clay blush was made in China. (make of that what you will)
Both shades are very neutral, and "nude" on my skintone. I know these would NOT work on super dark, rich skin. Which SUCKS. In my opinion they should have done a super pigmented rich blush shade, because those are more universal. Fair skinned people can buff and sheer it out on the cheek, and dark skinned people can layer it up once or twice. You know?
This is the Lip paint in the shade Birthday Suit on my NC20/25 Skin tone. It's about as "nude" as I would ever go, personally. I have never tried the matte lip paint formula before, and I don't know if it's just this shade? but this feels SO grainy on my lips. it feels like I did a lip scrub and didn't wipe/lick it off. It helps if I apply it all over, and then blend it in with a warm finger. But still. Weird.
Again, this is my first time trying the amazonian clay blush formula. This is a pretty matte pinky nudey shade on me. In the photo above, I have about three layers of it on my cheeks buffed in. It was slightly hard to blend, but I will be honest and say, I don't use or own any matte blushes, so I'm not used to the way they buff and blend. So! I think this will be a good blush shade for days where I'm wearing a bright lip and just want a hint of something on my cheeks!
Overal: I don't know! I like the blush, but could live without the lip paint.
If you've gotten this sephora birthday gift, what do you think?
My Valentines Day Outfit, and Makeup!
Hello friends!!
You all wont know this about me, but I'm SUCH a sappy person, I love, love! And I love seeing couples out in public holding hands, and smiling etc. I also love to show my love for my own loved ones!! So I adore valentines day!!
I'm getting together with a few friends tonight, and we're going to drink cheap wine and eat some pizza and celebrate our friendship!
Outfit:
This is the outfit I chose for today, even though it's currently in the negative here, I wanted to look cute! So I chose one of my father's soft, old, black shirts. A high wasted black pencil skirt, and a burgundy button up blouse. I'll be wearing brown leather booties with this outfit!
Makeup:
Base: I primed with a mattifying primer, then I used a tiny bit of my make up for ever orange corrector from my concealer palette from them and patted that in my inner corner of my eyes. I then took Kat Von D lock it concealer creme and dotted that under my eyes and a swipe on each cheek. I then took a buffing brush and blended that out, I took a big fluffy brush and patted MAC loose set powder all over my face to set my makeup, and then I took some MAC Blot powder and patted that onto my oily areas (tip of my nose, nose bridge, inner cheeks, chin, and whole forehead) I then spritzed some of ELF mist and fix to soak up some of the extra powder!
Cheeks: I took Clinique Cola pop on a duo fiber blush brush, and applied a tiny bit more than usual, to give myself a nice flushed look, I then took a angled blush brush and contoured along the lower sides of my cheek bones to lift them. I buffed Sephora Brand Microsmooth Baked Luminizor in 01 star dust (my holy grail highlight!) along my cheek bones, and very very lightly on the tip of my nose!
Brows: I wanted my brows to be fluffy and slightly more defined than usual. So I REALLY took my time today and filled them in. I took a small angled brush and ran brow powder along the bottom of my brows, starting in the inner corner. And then slowly built up the colour in any "sparse" spots. I took MAC waterproof brow set in Brown Ebony and combed that through them, and made sure the front of my brows were standing up and everything was in place!
Lips: I exfoliated my lips with ELF lip exfoliator in clear, then while I was doing my base and brows, I let some shea butter soak into them. When I got to my lips, I patted off the excess lip balm, and took Colourpop lip liner in Bossy (a cool bright red) and lined my lips, being careful not to go out of the lines, and then proceeded to fill in my whole lips with the lip liner! I pulled out my OCC Lip Tar in NSFW (a cool medium red), I remember this being a big deeper and that was what I wanted. But I decided to stick with this. With the cap still twisted closed, I shook and rolled the lip tar around in ym hands, then took a lip brush and squeezed out a tiny dot and did my lips in quarters. I took a TINY amount of concealer on a lip brush and evened it up a bit as well!!
Eyes: This was pretty basic. I didn't really know what I wanted to do exactly, so I just kept piling on glittery shadows until I got to this look! I started with primed lids (I used ELF sheer eye lid primer) and then set the primer with Tarte Whisper (a matte shade lighter than my skin tone) I took Tarte First Kiss (a satiny plummy purple) on a crease brush and really buffed and blew that out in the crease. I wanted a slightly messy look. I picked up a smaller crease brush, and ran some of Tarte Heartbreaker (matte cool deep brown) on the outer edges of my eyes and some in the inner edge as well! I picked up my MAC 217 and went HAM blending that out so it was a purpley plummy brown smokey look in the crease. I then applied a tiny amount of ELF smudge pot in Brownie Points (a metallic dark warm brown cream shadow) onto my outer corner of my mobile lids, and blended the upper edge before it dried/set. I then took some of Colourpop's Nillionaire (warm bronze with red glitter) and patted that onto the inner half of my mobile lids. I patted Colourpop Paisley (a sheer pressed glitter!) onto my inner corners. I took a matte purple and ran that along my lower lashline. To clean up my brow bone, I took the same base shade, Tarte Whisper, and I ran that along my brow bones, and above my crease to clean things up! I applied three coats of mascara, lined my waterlines with a warm brown liner. Then to REALLY go OTT, I took a rainbow clear glitter gel and patted that onto my inner half of my mobile lids!!
And I THINK that's it!! It looks like a LOT, but honestly, it took 30 minutes at most, and that's because I kept going back and adding more and more ahahah!!
Happy Valentines day, loves!!
You all wont know this about me, but I'm SUCH a sappy person, I love, love! And I love seeing couples out in public holding hands, and smiling etc. I also love to show my love for my own loved ones!! So I adore valentines day!!
I'm getting together with a few friends tonight, and we're going to drink cheap wine and eat some pizza and celebrate our friendship!
Outfit:
Makeup:
Base: I primed with a mattifying primer, then I used a tiny bit of my make up for ever orange corrector from my concealer palette from them and patted that in my inner corner of my eyes. I then took Kat Von D lock it concealer creme and dotted that under my eyes and a swipe on each cheek. I then took a buffing brush and blended that out, I took a big fluffy brush and patted MAC loose set powder all over my face to set my makeup, and then I took some MAC Blot powder and patted that onto my oily areas (tip of my nose, nose bridge, inner cheeks, chin, and whole forehead) I then spritzed some of ELF mist and fix to soak up some of the extra powder!
Cheeks: I took Clinique Cola pop on a duo fiber blush brush, and applied a tiny bit more than usual, to give myself a nice flushed look, I then took a angled blush brush and contoured along the lower sides of my cheek bones to lift them. I buffed Sephora Brand Microsmooth Baked Luminizor in 01 star dust (my holy grail highlight!) along my cheek bones, and very very lightly on the tip of my nose!
Brows: I wanted my brows to be fluffy and slightly more defined than usual. So I REALLY took my time today and filled them in. I took a small angled brush and ran brow powder along the bottom of my brows, starting in the inner corner. And then slowly built up the colour in any "sparse" spots. I took MAC waterproof brow set in Brown Ebony and combed that through them, and made sure the front of my brows were standing up and everything was in place!
Lips: I exfoliated my lips with ELF lip exfoliator in clear, then while I was doing my base and brows, I let some shea butter soak into them. When I got to my lips, I patted off the excess lip balm, and took Colourpop lip liner in Bossy (a cool bright red) and lined my lips, being careful not to go out of the lines, and then proceeded to fill in my whole lips with the lip liner! I pulled out my OCC Lip Tar in NSFW (a cool medium red), I remember this being a big deeper and that was what I wanted. But I decided to stick with this. With the cap still twisted closed, I shook and rolled the lip tar around in ym hands, then took a lip brush and squeezed out a tiny dot and did my lips in quarters. I took a TINY amount of concealer on a lip brush and evened it up a bit as well!!
Eyes: This was pretty basic. I didn't really know what I wanted to do exactly, so I just kept piling on glittery shadows until I got to this look! I started with primed lids (I used ELF sheer eye lid primer) and then set the primer with Tarte Whisper (a matte shade lighter than my skin tone) I took Tarte First Kiss (a satiny plummy purple) on a crease brush and really buffed and blew that out in the crease. I wanted a slightly messy look. I picked up a smaller crease brush, and ran some of Tarte Heartbreaker (matte cool deep brown) on the outer edges of my eyes and some in the inner edge as well! I picked up my MAC 217 and went HAM blending that out so it was a purpley plummy brown smokey look in the crease. I then applied a tiny amount of ELF smudge pot in Brownie Points (a metallic dark warm brown cream shadow) onto my outer corner of my mobile lids, and blended the upper edge before it dried/set. I then took some of Colourpop's Nillionaire (warm bronze with red glitter) and patted that onto the inner half of my mobile lids. I patted Colourpop Paisley (a sheer pressed glitter!) onto my inner corners. I took a matte purple and ran that along my lower lashline. To clean up my brow bone, I took the same base shade, Tarte Whisper, and I ran that along my brow bones, and above my crease to clean things up! I applied three coats of mascara, lined my waterlines with a warm brown liner. Then to REALLY go OTT, I took a rainbow clear glitter gel and patted that onto my inner half of my mobile lids!!
And I THINK that's it!! It looks like a LOT, but honestly, it took 30 minutes at most, and that's because I kept going back and adding more and more ahahah!!
Happy Valentines day, loves!!
Monday, 13 February 2017
Custom MAC Quad Swatches/Review
Hello!! Today we're going to look at my custom MAC Quad.
I like this quad because, I can just pop this into my bag and get two, or three different looks out of this one quad. So it's amazing for traveling for me!!
Clockwise in the packaging: Mulch, Embark, Woodwinked, Nylon.
Left to right from the swatches on my arm:
Nylon - Super shimmery white, Very soft and creamy, and highly pigmented.
Woodwinked - Shimmery golden brown. Soft, and light powdery. But pigmented and easy to use.
Embark - Matte reddish brown. It's stiff, and dry in the pan, but not as bad as my pan of Mulch.
Mulch - Lightly shimmery warm brown, My pan of it is very HARD and STIFF. this swatch is about 4 or 5 layers.
Looks I like to do with this Quad:
Mulch in the crease. Nylon on the Lid, Embark to deepen the outer corners, Woodwinked on lower lashline.
Mulch on the lid and crease, Embark on the outer half of my mobile lid, Woodwinked patted onto the middle of my lids, and Nylon to highlight.
Woodwinked on the lids, Mulch in the crease, Embark on my lower lashline, Nylon to highlight.
Overal: MAC shadows are hit and miss for me. My shadows from YEARS ago are all soft and powdery and lovely. But my newest ones (Humid, Mulch, Embark) are SO stiff, and dry.
I like this quad because, I can just pop this into my bag and get two, or three different looks out of this one quad. So it's amazing for traveling for me!!
Clockwise in the packaging: Mulch, Embark, Woodwinked, Nylon.
Left to right from the swatches on my arm:
Nylon - Super shimmery white, Very soft and creamy, and highly pigmented.
Woodwinked - Shimmery golden brown. Soft, and light powdery. But pigmented and easy to use.
Embark - Matte reddish brown. It's stiff, and dry in the pan, but not as bad as my pan of Mulch.
Mulch - Lightly shimmery warm brown, My pan of it is very HARD and STIFF. this swatch is about 4 or 5 layers.
Looks I like to do with this Quad:
Mulch in the crease. Nylon on the Lid, Embark to deepen the outer corners, Woodwinked on lower lashline.
Mulch on the lid and crease, Embark on the outer half of my mobile lid, Woodwinked patted onto the middle of my lids, and Nylon to highlight.
Woodwinked on the lids, Mulch in the crease, Embark on my lower lashline, Nylon to highlight.
Overal: MAC shadows are hit and miss for me. My shadows from YEARS ago are all soft and powdery and lovely. But my newest ones (Humid, Mulch, Embark) are SO stiff, and dry.
Saturday, 11 February 2017
What I got for my Birthday!
In case y'all don't know, today (the 11th of february!) is my birthday!! I am no longer a teenager. And I'm down with a severe cold ahaha. What a way to bring in my twenties!!
Anyway y'all are here for my birthday gifts!!
For my birthday this year, I wanted something low key, and calm. As I'm still recovering from my major surgery less than a month ago, and I'm sick as hell!
So I went out for lunch with my family, and got a make over at sephora!! And now I'm home playing video games with my brother. :-)
Free things I got:
KVD Lock it foundation sample in the shade 45 warm. It's yellow!! and looks like a good match for me in different lighting! I'll further test this out!
LUSH'S 9 to 5 Lotion Cleanser.
LUSH'S Ultrabalm Cleanser. I CLEARLY was looking into makeup removers at LUSH!!
LUSH'S Enchanted Eye Cream. The sales lady had such SMOOTH undereyes and said she uses this. So I'm willing to give it a go!!
LUSH'S Rosy Cheeks Fresh Face Mask. I knew there would be a LUSH at the mall we were at, so I brought 5 of the 9 black pots i'v been stashing and got myself a nice calming face mask that smells like roses!!
Tarte Sephora Birthday Gift. I chose the Tarte gift, because my skin is VERY picky and will break out in cystic acne. So I didn't want to risk the other two skin care gifts. The Tarte gift is a mini matte pinky blush. and a light nudey matte lip paint!
Mini Urban Decay Venom Vice Lipstick. I decided to pick up this mini lipstick, because i'v been eyeing up the shade for a while, and it was free with my sephora points so hey!
Gifts I got:
Atelier Cologne Bergamote Soleil Perfume. I'v gone through 3 (?) samples of this perfume, and my family bought my the mini travel sized one! I told them not to buy the full sized $90 one. I'd feel WAY too guilty!
BITE Beauty Amuse Bouche Lipstick Beetroot. I LOVE this lipstick formula, it smells like Limeaid, it's a canadian brand, and the actual lipstick is creamy, moisturizing, and beautiful!! This shade is a darkened berry on me! (aka right up my alley!)
This is the look the MUA did on me:
Sorry for the horrid android camera quality, but I didn't get home until sundown!
I asked the MUA to put Kat Von D's Poe on me, and she designed a whole look around Poe! Which I will be going back for and buying next time I have disposable money!
All in all, it's been an amazing, relaxing birthday!!!
Anyway y'all are here for my birthday gifts!!
For my birthday this year, I wanted something low key, and calm. As I'm still recovering from my major surgery less than a month ago, and I'm sick as hell!
So I went out for lunch with my family, and got a make over at sephora!! And now I'm home playing video games with my brother. :-)
Free things I got:
KVD Lock it foundation sample in the shade 45 warm. It's yellow!! and looks like a good match for me in different lighting! I'll further test this out!
LUSH'S 9 to 5 Lotion Cleanser.
LUSH'S Ultrabalm Cleanser. I CLEARLY was looking into makeup removers at LUSH!!
LUSH'S Enchanted Eye Cream. The sales lady had such SMOOTH undereyes and said she uses this. So I'm willing to give it a go!!
LUSH'S Rosy Cheeks Fresh Face Mask. I knew there would be a LUSH at the mall we were at, so I brought 5 of the 9 black pots i'v been stashing and got myself a nice calming face mask that smells like roses!!
Tarte Sephora Birthday Gift. I chose the Tarte gift, because my skin is VERY picky and will break out in cystic acne. So I didn't want to risk the other two skin care gifts. The Tarte gift is a mini matte pinky blush. and a light nudey matte lip paint!
Mini Urban Decay Venom Vice Lipstick. I decided to pick up this mini lipstick, because i'v been eyeing up the shade for a while, and it was free with my sephora points so hey!
Gifts I got:
Atelier Cologne Bergamote Soleil Perfume. I'v gone through 3 (?) samples of this perfume, and my family bought my the mini travel sized one! I told them not to buy the full sized $90 one. I'd feel WAY too guilty!
BITE Beauty Amuse Bouche Lipstick Beetroot. I LOVE this lipstick formula, it smells like Limeaid, it's a canadian brand, and the actual lipstick is creamy, moisturizing, and beautiful!! This shade is a darkened berry on me! (aka right up my alley!)
This is the look the MUA did on me:
Sorry for the horrid android camera quality, but I didn't get home until sundown!
I asked the MUA to put Kat Von D's Poe on me, and she designed a whole look around Poe! Which I will be going back for and buying next time I have disposable money!
All in all, it's been an amazing, relaxing birthday!!!
Smashbox Halo Long Wear Blush in Warm Glow Review
Good afternoon!!
Today we're talking blush, Smashbox blush to be precisely.
Warm Glow is a warm neutral blush, that leans more orangey on my warm skin. It is a nice satiny finish. No visible shimmers.
The swatch you see is VERY built up. It's about four layers. I find for my Light to Medium skin I need two layers for a natural barely there look, and three for a more visible look.
I'm going to say it. I hate the packaging. It is NOT travel friendly at ALL. which may shock you. I'll turn the dial so slowly and it still grinds WAY more than you needs for a single application, so you dip your brush in apply the blush then you snap the lid shut, right?
WELL. The now loose powder, goes EVERY where inside the container. I'v brought this blush with me on work trips, and I'v opened this up to apply, and blush has DUMPED out EVERYWHERE. All over my hotel bed, and all over my outfit!! Not cool.
I'm almost thinking about grinding the whole thing up, and then dumping into a different container. But I don't know yet.
Pros: Lasts 10 hours on my oily cheeks. Good for light skin, because it's SO buildable and blendable. I think this could work up to Dark end of Medium skin tones. Scent free. Very smooth and soft.
Cons: Packaging sucks. It wouldn't work on deep dark skintones. Pretty expensive for the amount you get. (0.07 Oz)
Overall: 6/10.
Today we're talking blush, Smashbox blush to be precisely.
Warm Glow is a warm neutral blush, that leans more orangey on my warm skin. It is a nice satiny finish. No visible shimmers.
The swatch you see is VERY built up. It's about four layers. I find for my Light to Medium skin I need two layers for a natural barely there look, and three for a more visible look.
I'm going to say it. I hate the packaging. It is NOT travel friendly at ALL. which may shock you. I'll turn the dial so slowly and it still grinds WAY more than you needs for a single application, so you dip your brush in apply the blush then you snap the lid shut, right?
WELL. The now loose powder, goes EVERY where inside the container. I'v brought this blush with me on work trips, and I'v opened this up to apply, and blush has DUMPED out EVERYWHERE. All over my hotel bed, and all over my outfit!! Not cool.
I'm almost thinking about grinding the whole thing up, and then dumping into a different container. But I don't know yet.
Pros: Lasts 10 hours on my oily cheeks. Good for light skin, because it's SO buildable and blendable. I think this could work up to Dark end of Medium skin tones. Scent free. Very smooth and soft.
Cons: Packaging sucks. It wouldn't work on deep dark skintones. Pretty expensive for the amount you get. (0.07 Oz)
Overall: 6/10.
Subscribe to:
Posts (Atom)